Moving from EJS to JSX
As alluded to in a previous post, I recently switched my templating system from EJS to JSX. Why? Allow me to quote myself:
Switching to JSX is something I’ve been wanting to do for a while. I wanted to leverage JSX when I first setup metalsmith as my static site generator, but using JSX for templating didn’t seem to have a lot of buzz in the metalsmith community and I couldn’t piece together enough disparate pieces of information to get it working. EJS, meanwhile, was mentioned in the metalsmith docs as a viable templating language and had lots of Google-able docs and troubleshooting information, so I went with that because I could get it working. I love the expressiveness of JSX when doing templating because I can “just write JavaScript”, but EJS let me write JavaScript too, so I was happy with it. At least at that moment.
While both allowed me to write templates using “just JavaScript”, there were a additional rationales for why I wanted JSX. I’m going to run through a couple of these here and explain how switching to JSX was a value-add for me.
Benefit: Familiarity
I love React and am very familiar with it. I use it on lots of work and personal projects. The truth is, I’m looking at React code almost every single day, so I’m quite fluent in JSX and can get stuff done fast.
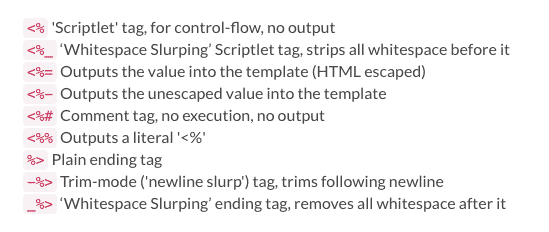
While EJS doesn’t necessarily have a lot of cognitive overhead because your doing templating logic in JavaScript, I did often find myself having to lookup syntax around EJS tags for things like control-flow, whitespace slurping, unescaping values, comments, etc. For example, here’s a screenshot of the different tags in EJS:
In addition to syntax familiarity, JSX works with prettier so I get my syntax auto-formatted for me, whereas a lot of my EJS templates I had to format myself, by hand. I forgot how tedious that was; much easier to let the machines to it for me.
Benefit: Data and Dependency Transparency
One of the things I always felt a little confused about with EJS templates through metalsmith was the lack of transparency around the data flowing through the templates. Let me try to explain more.
Let’s say I wanted a 404 page on my site. Under my current system, I would create a file like 404.html.ejs that looked something like this:
---
layout: page.ejs
title: 404 Page Not Found
---

<div class="page-not-found">
  <h1>
    Page Not Found
  </h1>
  <!-- More Stuff here -->
</div>
That might look somewhat familiar to you. I’ve got some YAML metadata at the top of the file that defines a couple pieces of information. layout tells EJS what layout to use, because this template needs to fit inside some larger document that shares a template with all the other pages on my site (page.ejs is the template file that starts with <!doctype html>...). And I’ve got a page title. But where does that title get used? Well, you can probably guess it gets used inside page.ejs in a manner like <title><%- title %></title>. Is there anywhere else it gets used? Are there other values that page.ejs requires that I need to define in the YAML front-matter from this file? Who knows. You can’t know by looking at this file. You’d have to go look at page.ejs. And you know what my page.ejs file looked like?
<%- include("_header.ejs") %>
<%- contents %>
<%- include("_footer.ejs") %>
Now I’ve gotta go look at _header.ejs and _footer.ejs if I want to know where title is being used and if they expect any other values.
On top of this, EJS doesn’t have any mechanics for declaring and checking the data requirements of each of your templates. The best you could do, and this is what I generally did, is put a comment at the top of your file stating the data needs inside of it, i.e.:
<%#
  The following pieces of data are required here this file:

  title (string) - Used in the <title> tag, as well metadata (like og: elements)
  site
    site.title (string) - Title of the site itself
    site.url (string)
  ...etc...
%>
<!doctype html>
<html>
<!-- More stuff here -->
</html>
To extend my example from previously, let’s say on my icon gallery site I want my 404 page to display 40 random icons from the site (which is what I actually do). How do you do this in EJS? Well, you have to come to understand what’s happening under the hood. In my case (and this took me some time to figure out, trust me, I’m no genius) I was using metalsmith-in-place for rendering pages along with metalsmith-layouts for rendering posts (and pages after they were rendered by metalsmith-in-place) and these were using a JSTransformer for EJS under the hood. Phew. That’s a lot right there, I know.
Under the hood, what essentially was happening is there was some code like this that ran in node:
const fs = require("fs");
const ejs = require("jstransformer")(require("jstransformer-ejs"));
const renderedOutput = ejs.render(
  require("path/to/layout.ejs"),
  {
    // these would come from metalsmith
    ...dataFromYamlFrontMatter,
    ...dataFromGlobalMetalsmithMetadata
  }
  "path/to/template/includes"
);
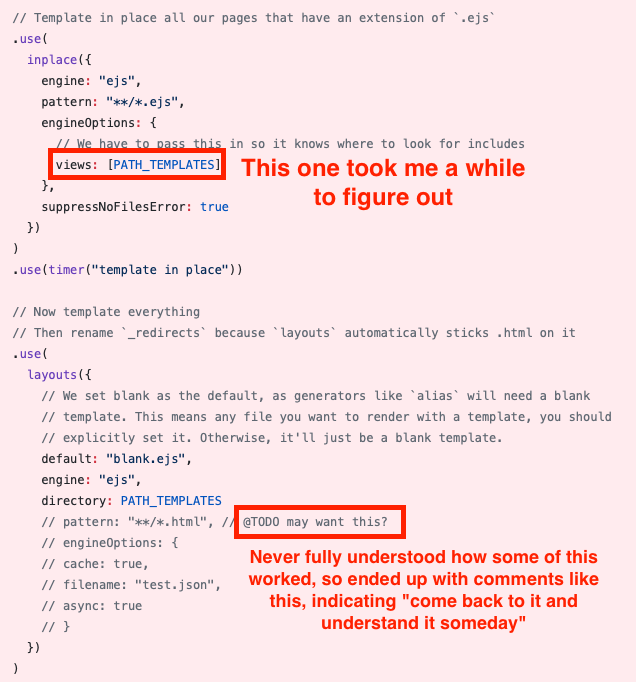
Again, it took me a while to figure out how to just get EJS templates rendering. Then more time to figure out how it actually worked when it was rendering. You can deduce this by looking at my old metalsmith code:
When I finally got my EJS templates rendering, I thought “ok, so what data is available to me in these templates?” Essentially there was data available to me globally but you wouldn’t know what it was by looking at the EJS template. So to render 40 random icons from the site on the 404 page, I’d have code that looked like this:
---
layout: page.ejs
title: 404 Page Not Found
---

<div class="page-not-found">
  <h1>
    Page Not Found
  </h1>
  <ul class="icons">
    <%- site.icons.forEach(icon => { %>
      <li><img src="<% icon.src %>" alt="<%- icon.title %> />
    <% }) %>
  </ul>
</div>
Just looking at that template, you see a bunch of magic variables. title is declared a the top, but you don’t know where it is being used. site is being used but you don’t know where it’s coming from or what shape it is. All you can infer from this is site.icons is an array of icon objects which have a key of src and title. The worst part here is that, if for some reason your data was incomplete, like one of your objects in site.icons didn’t have a src key, you’d never know it when you built your site. The only way you’d know is if, by chance, you opened up that particular page after it was rendered and saw one of the images not displaying properly and you debugged that up the chain to see it was because src was not defined.
If you’re familiar with React, you probably can understand where I am going with all of this. In React, this all looks very different. First of all, because I wasn’t using any plugins to render my pages with metalsmith, there was no ambiguity about what was happening. I knew first-hand what data I was passing to each and every template because I wrote it.
The way I ended up doing it is I used react context to make available site-wide data to any component (i.e. template) that needed it (like site.icons for all the icons in the site, or site.title for the title of the site). Then metalsmith would require the actual component itself:
const ReactDOMServer = require("react-dom/server");

// metalsmith-specific code to loop through each page
const Component = require("dynamic/path/to/Component.jsx");
const templateOutput = "<!DOCTYPE html>" +
  ReactDOMServer.renderToStaticMarkup(
    // site is my metalsmith metadata I can pull in at runtime
    <SiteContext.Provider site={metadataFromMetalsmith}>
      <Component />
    </SiteContext.Provider>
  )
So given the 404 page example from earlier, my React template looks more like this:
const React = require("react");
// Rather than having yaml metadata which specifies a layout, this is just a
// module in node, so I require any dependencies, like my <Page /> layout
const Page = require("./Page.jsx");
const { withSite } = require("../SiteContext.jsx");

// This is the data you need in this template
Page404.propTypes = {
  site: shape({
    icons: arrayOf(shape({
      src: string.isRequired,
      title: string.isRequired
    }))
  })
};

function Page404({ site }) {
  // <Page /> is given the specific data it needs as a prop, rather than a YAML
  // front-matter piece of data
  return (
    <Page title="404 Page Not Found">
      <div className="page-not-found">
        <h1>
          Page Not Found
        </h1>
      </div>
      <ul className="icons">
        {site.icons.map(icon =>
          <li>
            <img src={icon.src} alt={icon.title} />
          </li>
        )}
      </ul>
    </Page>
  );
}

// `withSite` is essentially a helper function for my context component.
// It takes a component and returns a component wrapped in my site metadata.
// This allows me to wrap any component, i.e. template, in my site context to
// inject it with global metadata.
//
// Example:
// const withSite = Component => props => (
//   <SiteContext.Consumer>
//     {value => <Component {...props} site={value} />}
//   </SiteContext.Consumer>
// );
module.exports = withSite(Page404);
Granted there’s more code here than the EJS example. But this code was more clear for my overall project. It made the dependencies of my 404 page more transparent. I could come into this file and more clearly see what exactly is going on, what data was flowing through this template, what shape it would take, what other templates or layout files were needed, what data they needed, etc.
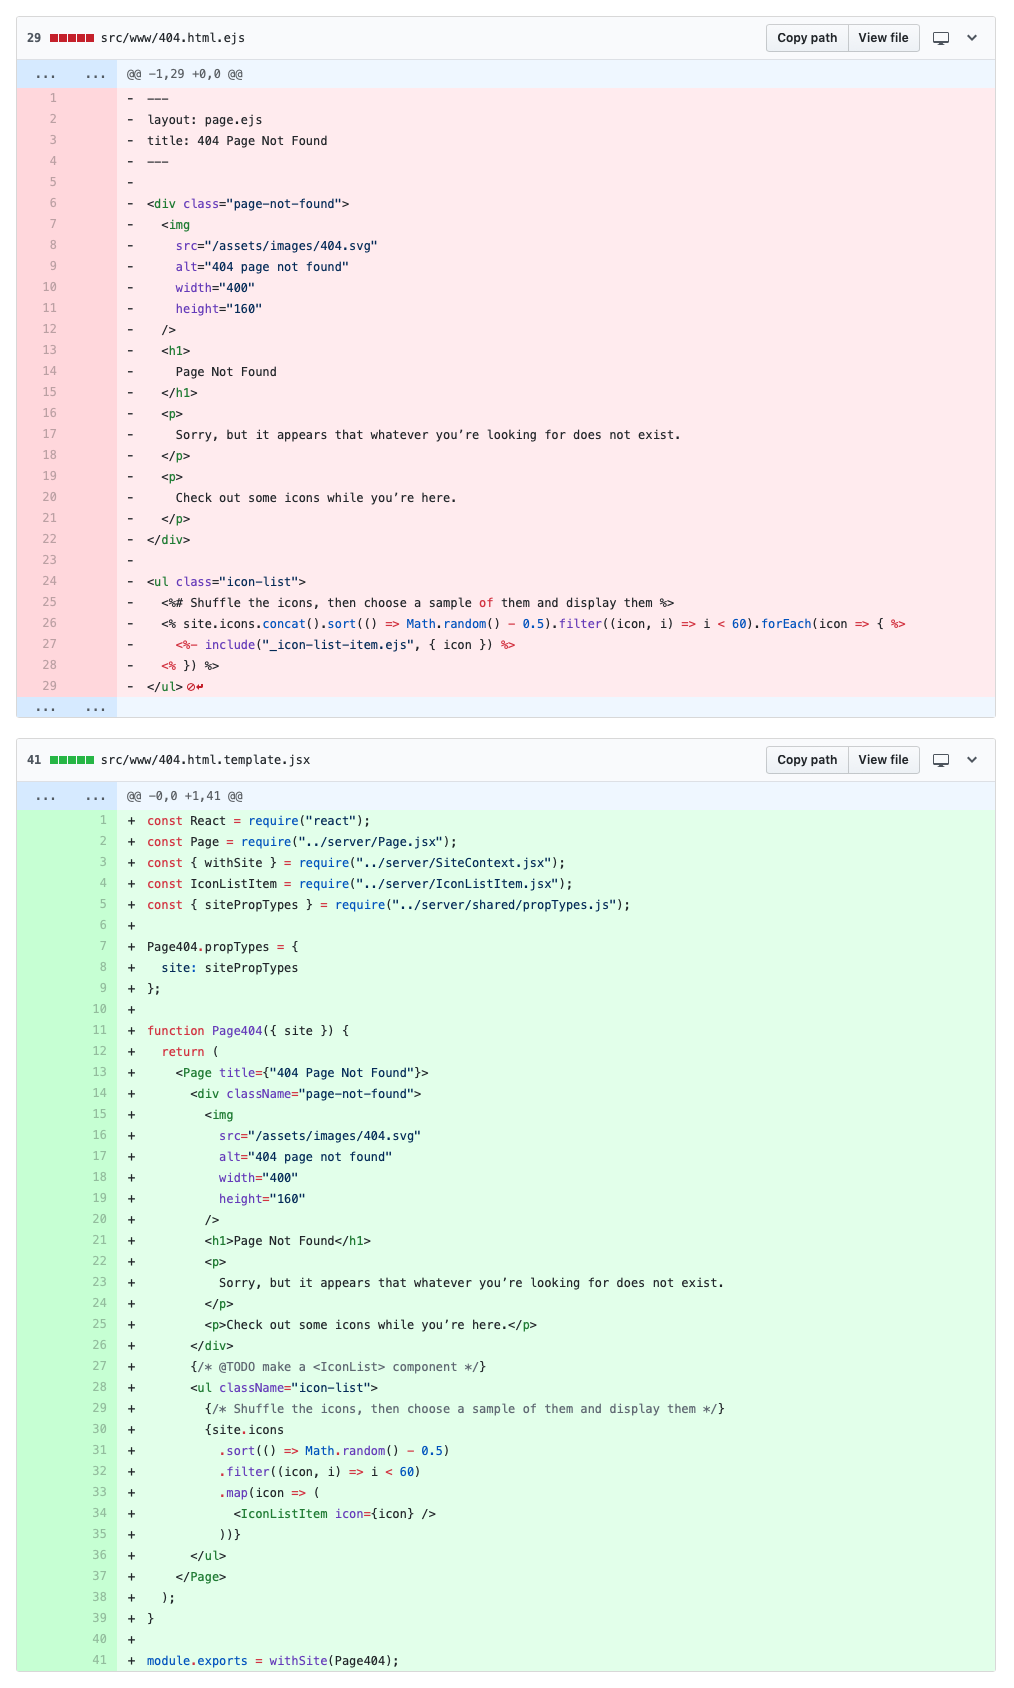
Here’s a screenshot of the final diff on Github before I merged the code. You can see the difference between what an EJS template looked like and what a JSX template looked like.
Not only did the inner-workings of my templating code become more clear with JSX, but as I alluded to above, I got proptype checking for free! This allowed me to write a single set of rules for shared data types I used throughout my templating system. For example, I had a propTypes.js file that looked something like this:
const {
  array,
  arrayOf,
  instanceOf,
  oneOf,
  object,
  shape,
  string } = require("prop-types");

const iconPropTypes = PropTypes.shape({
  date: instanceOf(Date).isRequired,
  category: string,
  color: string,
  designer: string,
  developer: string,
  // ...etc
});

const sitePropTypes = shape({
  icons: arrayOf(iconPropTypes).isRequired,
  themeId: oneOf(["ios", "macos", "watchos"]).isRequired,
  // ...etc
});
I could import any of these proptype declarations into my templating files and then when metalsmith was looping through every single “blog post” on my site, it would check my data types against my expectations. This actually led me to discover a couple posts where I had missing, incomplete, or malformed data, something I had never known about because EJS didn’t surface that information. So I was able to do a little bit of data cleanup along the way. Now I can be much more confident about the completeness of the data across the 1,000+ icons that are in the site.
Benefit: Leveraging Modules in Node
As you probably noticed from the code samples above, one of the things that changed in my transition from EJS to JSX was that my templates went from being a combination of YAML+EJS to being, essentially, JavaScript modules for node. Here’s another screenshot of a diff between what one of my templates looked like as an EJS template vs. what it looked like as a JSX template.
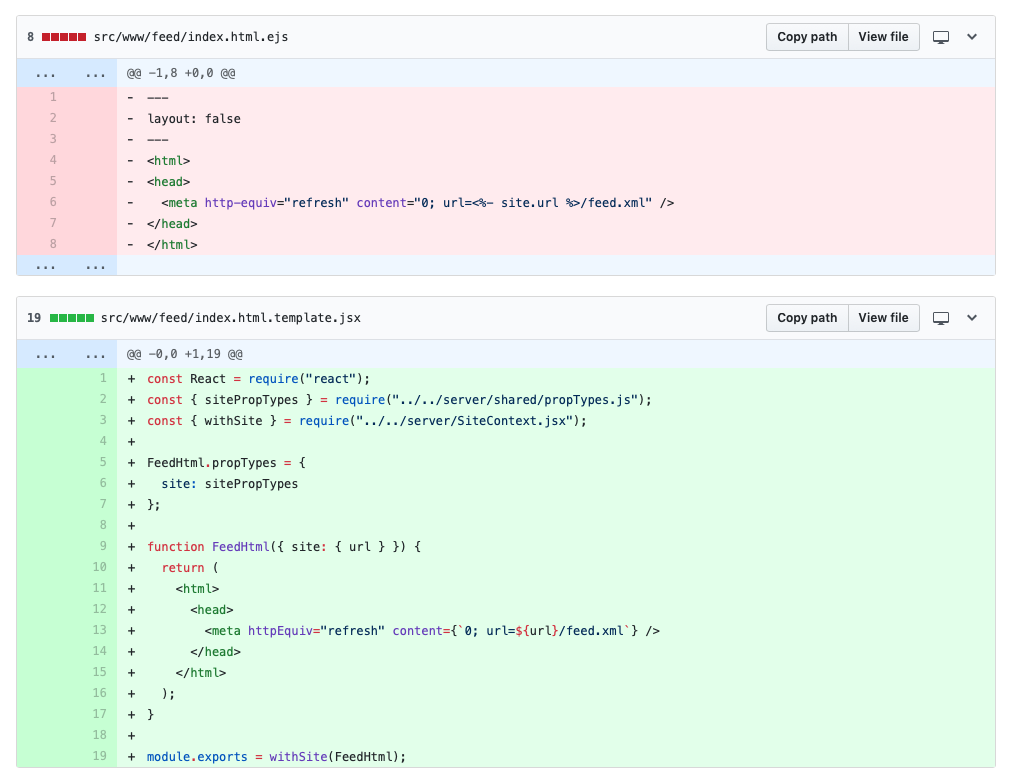
This is a very straightforward example of the differences between an EJS template and a JSX template. It’s a simple redirect in HTML. In the EJS template, you can see I had to specify layout: false which tells the EJS engine to not wrap that file in any other layout. Then I have that magic <%- site.url %> variable, which kind of just appears out of nowhere.
In contrast, the JSX template file is very clear about the things it requires because it’s a module for node. In addition to React, you can see it requires the react context wrapper for my site data. This is what provides my template the global metadata available to every template file through the react context API. Plus, not only do I get the benefit of that dependency being made explicitly obvious, but by leveraging shared proptypes, I get proptype checking across all my templates for free! When this file gets processed, if for some reason the value required for rendering this template is missing (or not a value type I am expecting, as declared in my propTypes.js file) then React will warn me about it; whereas EJS would just fail to render the correct value and then continue on silently.
Not only did I find writing my templates as modules for node more clear in terms of expressing their dependencies, but because it was “just JavaScript for node” I had a lot of power and flexibility in my templates. I could have any of my templates import custom or third-party node modules for use, which made this new templating system incredibly powerful: the entire npm registry available at my fingertips for use in any template (insert maniacle laugh, not that I would, of course).
There is one other unique and curious aspect of this approach that is worth noting. While attempting to use JSX as a templating system for all of my files, I ran up against a problem: how do you render non-HTML files? There were a couple cases where I needed to render non-HTML files like XML and JSON, and JSX would choke in those cases.
For example, I was outputting an XML file which served as my site’s RSS feed. How do you render a node like <atom:link> in JSX? It does seem possible, but I didn’t want to go the route of declaring namespaces. Most of my use cases were relatively simple, so using something like tagged template literals in JavaScript made much more sense to me. I had an XML redirect file that looked like this as an EJS template:
---
layout: false
---
<redirect>
  <newLocation><% site.url %>/feed.xml</newLocation>
</redirect>
That didn’t translate well to JSX because of the custom XML tags. What I needed to do was output that markup as a string. That’s easy enough in JavaScript with template literals:
const str = `
<redirect>
  <newLocation>${site.url}/feed.xml</newLocation>
</redirect>
`
But how do you get React to render that? It’s got to live in a parent node of some sort, and I don’t want it wrapped in a <div>. After thinking about it for a second, the idea popped into my head, “use dangerouslySetInnerHTML on a fragment!” That should work right? It’ll render the contents without the parent (which is what I figured fragments were doing).
function MyComponent(props) {
  const obj = { __html:`
    <redirect>
      <newLocation>${site.url}/feed.xml</newLocation>
    </redirect>
  `};

  return (
    <React.Fragment dangerouslySetInnerHTML={obj}>
  );
}
But it doesn’t work. Turns out, other people have had the same idea. I threw my two cents in with everybody else’s because I figured that’d be a really neat use case for fragments. But that still left me in a scenario where I couldn’t render my XML file with JSX.
So what I did is I came up with a system to process both JSX templates and my own custom “JS templates”. How’d I do that? If I wanted to render an HTML file written as a JSX template, I would add .template.jsx to the file name, i.e. index.html.template.jsx. The .template.jsx was to identify which files should be processed as JSX, then when that processing was done, I’d strip that extension from the file name so I was only left with index.html. However, if I wanted a file to be processed under my custom “JS templating system”, I would append the suffix .template.js. These “template” files would export a function that would return a string which allowed me to write template files using tagged template literals. This isn’t exactly how it worked, but this code illustrates essentially what was happening:
// Example of the code processing all my templates
files.forEach(file => {
  let out = "";
  // If it's a JSX file
  if (file.endsWith(".template.jsx")) {
    // Import the component file
    const Component = require(file);
    // Render the component template with our data as props to a string
    const out = ReactDOMServer.renderToStaticMarkup(<Component {...props} />);
    // Write the string as a file
    fs.writeFileSync(
      file.replace(".template.jsx", ""),
      out
    );
  }
  // If its a "JS" template
  else if (file.endsWith(".template.js")) {
    // It should export a default function, so get that
    const fn = require(file);
    // Call it with the template props/data
    const out = fn(props);
    // Write the file
    fs.writeFileSync(file.replace(".template.js", ""), out);
  }
});
This allowed me to write the EJS template example I showed earlier like this:
const MyFunction = ({ site }) => {
  return `
    <redirect>
      <newLocation>${site.url}/feed.xml</newLocation>
    </redirect>
  `;
};

module.exports = MyFunction;
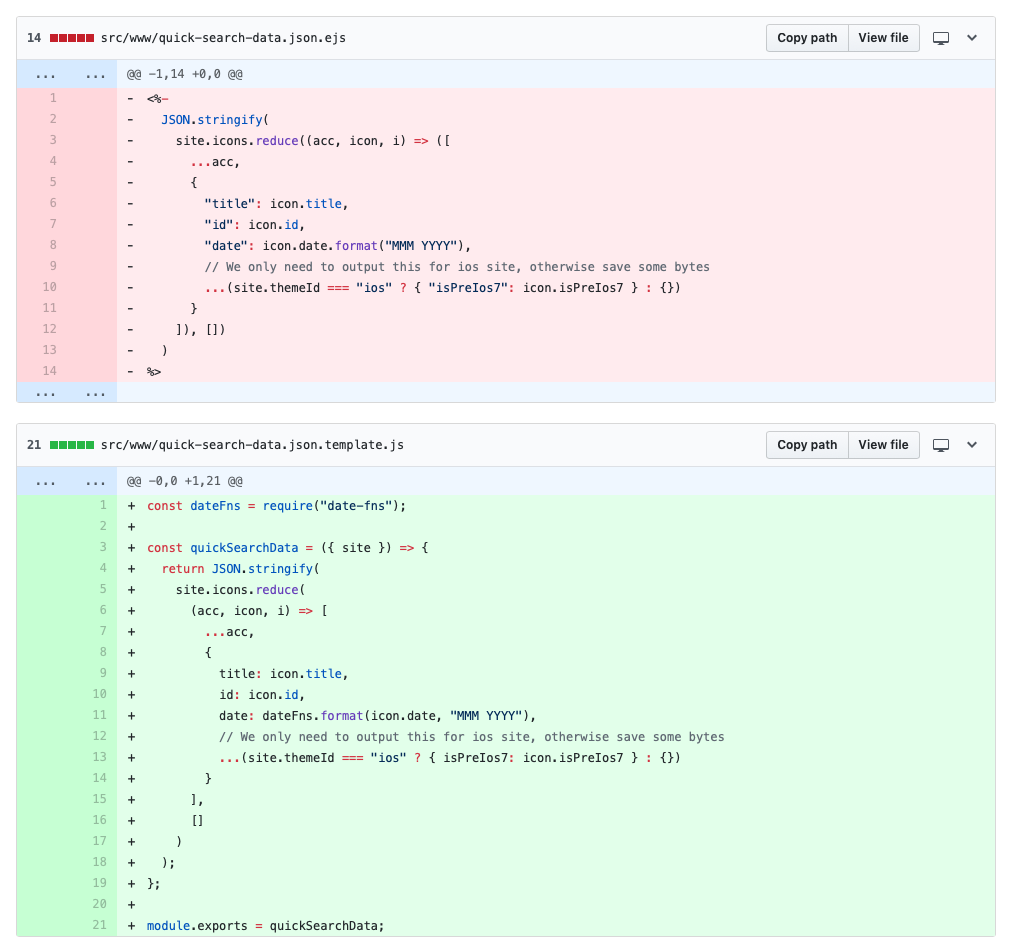
What’s really neat about this approach is I could use it to return just about anything I wanted that JSX didn’t support. For example, I was also writing a couple JSON files with data from my site. As described above, I couldn’t render a JSON string without a parent DOM element, so I used one of these custom “JS templates” of mine. Here’s an example of what that file looked like as an EJS template vs. as a JS template.
I actually think this worked out really well for my use cases. If that fragments issue for React ever gets resolved, I’ll probably switch over to a JSX-based solution, but for now, this works perfect.
Conclusion
This was quite the post and I didn’t even get to cover half the stuff I wanted to talk about. For example, I tried writing all of this code as ESM and then use --experimental-modules in node. I banged my head against my computer a lot in the process, but ultimately failed to get it working how I wanted. However, I came away with a lot of new knowledge about the inner workings and gotchas of module systems in JavaScript that’ll probably be of value in the future. So all those bruises weren’t for nothing (and you can read my comments on the matter from my PR). If you want to browse the code from all the changes I’ve described in this post, you can check out the PR in the repo. Warning: it’s not small.
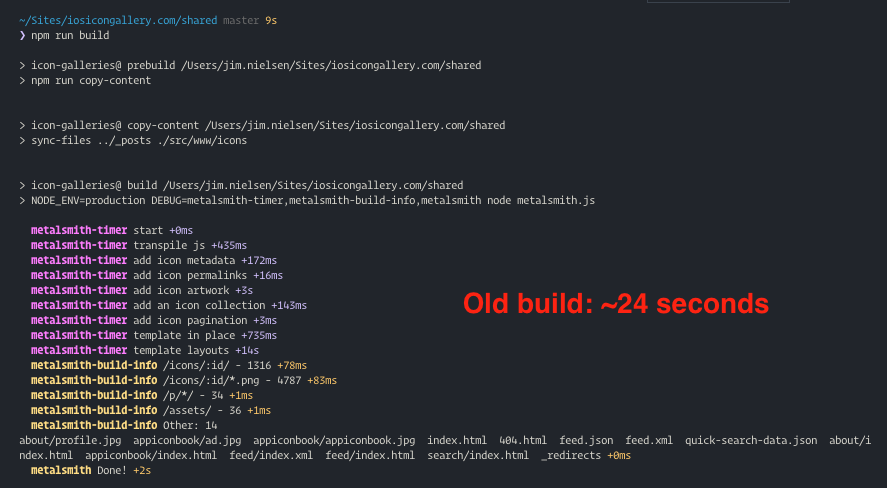
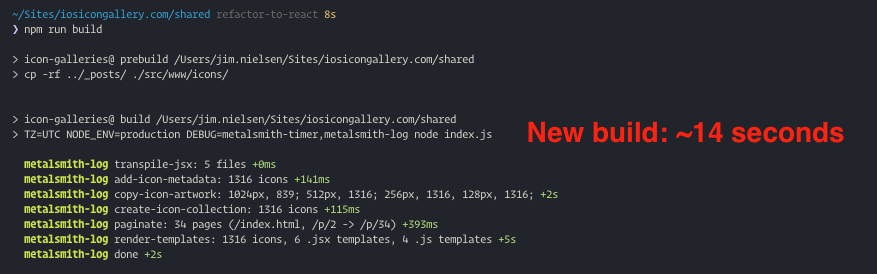
In terms of the build itself, it actually got quite a bit faster. Doing my own rendering with React instead of relying on two different third-party plugins cut my build time by about 10 seconds.
Update: Jan 27, 2020
I moved from JSX to components using tagged template literals in JavaScript!