Netlify Public Folder, Part III: How? The Winding Road to Making a Local Folder Sync to Netlify’s Global CDN
This is part final installment in a three part series:
- Netlify Public Folder, Part I: What?
- Netlify Public Folder, Part II: Why?
- Netlify Public Folder, Part III: How?
You might want to read the previous posts for this one to make complete sense. Even then, I make no guarantees it will make sense.
In my previous post, I talked about why Netlify Large Media wasn’t for me. Instead, I wanted a solution like the old Dropbox Public folder: drag a file into a folder and see it show up on a global CDN. This post is going to dive a bit more into the details of how I built that on top of Netlify’s platform.
I Didn’t Think Netlify Could Help Me—They Proved Me Wrong
I’ve been using Netlify for all my web build/deploy/hosting needs. It’s wonderful. 5 stars, would use again.
But the problem with my icon gallery sites is that my git repos were getting yuge. All those static PNG files in git were becoming problematic. And I didn’t see how Netlify could help me. There were only two ways to deploy a site via Netlify:
- Hook up a site to a git repo and have Netlify auto deploy when you push commits
- Drag and drop a folder of files via the Netlify UI each time you want a deploy.
And I didn’t want all my icon PNG files 1) in a git repo, or 2) dragged to a web interface anytime I want a deploy. I just wanted to drop a bunch of static files on Netlify’s global CDN but it didn’t seem possible. I started thinking about other possible avenues for a solution, but none looked too promising. Have you ever managed your own S3 bucket hooked up to their CDN? Ain’t nobody got time for that.
As I was thinking about the problem confronting me, I asked the Twitter world about it:
Question: is there some kind of service out there, like Dropbox, where you drag and drop files to a folder on your Mac which syncs to a server and makes each file immediately available via a URL on a CDN? Kind of like the old Dropbox public folder?
After explaining a bit more about what I wanted, @swxy told me it was, in fact, possible with Netlify and pointed me in the right direction:
can totally be done with the netlify api and js-client.
After digging around the docs a bit and finding out what was possible, I realized the implementation was actually quite straightforward. Thanks to the hard working folks at Netlify, there was already a tool to deploy a folder via Netlify’s API. All I needed was a deploy script. In it’s most basic form, that script looked like this:
const NetlifyAPI = require("netlify");
const client = new NetlifyAPI("YOUR_TOKEN_HERE");

client
  .deploy("SITE_ID", "/path/to/folder", {/* options */})
  .then(res => {
    /* site was successfully deployed!
       `res` is netlify telling you about it */
  })
  .catch(err => {
    console.error(err);
  });
Awesome! With just a few lines of code, I had the solution I was looking for: deploy a local folder of files to a global CDN!
Now the only thing I needed was a way to make the deploy script a bit more accessible. I could have made an alias to the script and then, anytime I wanted to “sync” my local folder to the CDN, just open the terminal, type the command, and let it do its thing. But I wanted sometime a bit more elegant, a tool a bit more “native” to my Mac.
Automated Deploy Script, Attempt 1: BitBar
My first thought was to build another BitBar plugin. I say another because I already built a menubar plugin for Netlify once before, so this approach seemed actually achievable from a technical perspective. And it was pretty straightforward too based on BitBar’s API.
#!/usr/bin/env /usr/local/bin/node
const fs = require("fs");
const NetlifyAPI = require("netlify");
const path = require("path");

console.log("Netlify");
console.log("---");
console.log(
  "Sync to CDN | bash=/usr/local/bin/node param1=/Users/jimnielsen/Sites/cdn/deploy-to-netlify.js"
);
What that code above is basically doing is outputting a link that goes in a menubar dropdown which, when clicked, opens a terminal window and triggers my Netlify deploy script.
Pros:
- I already know how to work with BitBar and build this
- Manual deployment. I get to decide when I’ve made file changes that I consider to be ready for deployment. No wasted deploys for batch changes.
Cons:
- Manual deployment. I have to remember to deploy anytime I change files, which is a click away and a bit obtrusive because it launches a terminal window (which I could change by telling BitBar to silently launch the window, but then I can’t see a log of what happened).
In summary: this approach worked, but I didn’t love the experience of it. It was basically a GUI shortcut to launching a terminal script; in other words, it was one level of abstraction above opening the terminal and then typing the command to execute a script.
Automated Deploy Script, Attempt 2: Script Editor on Mac
One of the things I really felt was lacking from the BitBar approach was the feedback loop. My options were: open the deploy script in a terminal window every time I deploy and see the log of what happened, or silently trigger the script and never see what happened (unless I went to netlify.com and looked up if the deploy was successful).
This got me thinking about how I could achieve some more subtle level of feedback. This threw me down a rabbit hole of building something “closer to the metal” of macOS. Could I trigger like a system notification that just said, “Deploy successful! n files changed"? What about some kind of live “files are syncing” progress bar? These questions led me to discover something I’d vaguely known about but never actually looked into: building native applications for Mac using JavaScript.
I have vaguely known about building native apps for Mac using JavaScript. There’s Electron, of course, but I’d never dabbled in it. I also remember an old post by a friend about building OS X apps with JavaScript. I re-read it and followed the links in the post to a number of related articles. Then I learned about this thing called “JXA” which looked very interesting.
I hacked around on this a bit and figured out how to get the native script menubar item up with my custom script in it:
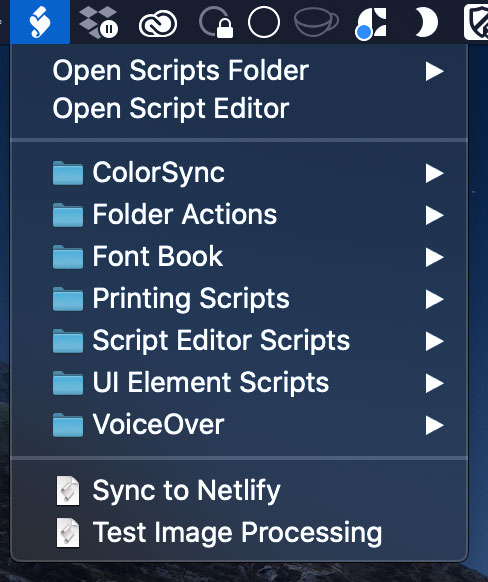
I even got it working:
You probably noticed that, when I say “working”, I mean I was able to write some simple JavaScript in the Script Editor app that merely opened the terminal and triggered my node deploy script.
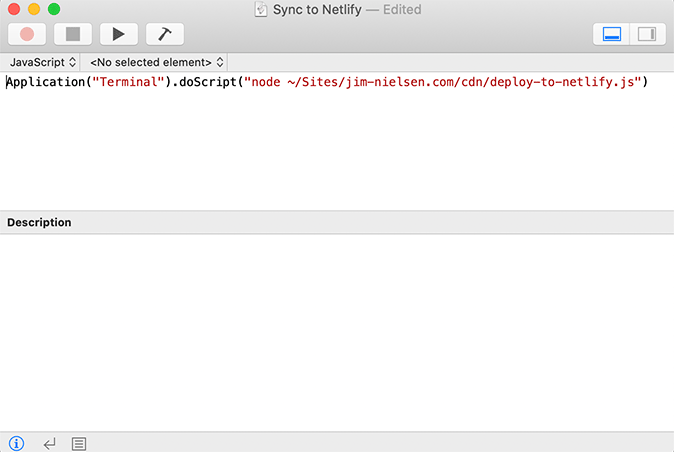
So really, what I had was the same thing as my first BitBar solution: a GUI where I can click and trigger a script in the terminal.
After a couple hours of researching and trying to deduce exactly how to achieve what I wanted—native macOS UI controls and feedback mechanisms—I basically gave up. Apple’s docs on scripting looked very promising, especially the parts about file watching, displaying notifications, and displaying progress. Those were all exactly the kinds of things I wanted to do: watch some files for changes, do something in response, display progress as things were completed, then provide feedback when its all done.
In the end, though, I couldn't quite get things working. I’m so used to working in this node/npm mindset, but I was unsure about how to run a node script using macOS automation. It sounded like you could use a bundler to build the script then run it as an automation script, but once I read “bundler” I was ready to throw in the towel. I was too fatigued to throw a bundler on top of everything I was already trying to learn and setup (not to mention maintenance of the thing over time). There were some other interesting JS libs that looked like they might help, but I was too far in at this point and wanted out.
Pros:
- Possibility to access native macOS libs for things like watching files, showing progress, or triggering notifications.
- Script tools are built-in to the Mac
Cons:
- Mac automation using JavaScript is a new concept/syntax to learn. Difficult to find really great, definitive, exhaustive docs (Apple basically gives you release notes for JavaScript automation, but not great docs, at least that I can tell) other than Mac Automation Scripting which is more detailed if you’re doing AppleScript
In summary: I could see myself coming back to this prospect in the future. The idea of the Mac natively supporting JavaScript for scripting automation is incredibly intriguing. I’d really love to learn more about it, and how the worlds of npm and JXA could (or should) meet. But at the end of the day, I just wanted to get something working and so skipped this particular avenue. Although I think this will be good project to “grind my axe on” someday if I ever want to get into macOS automation with JavaScript.
Automated Deploy Script, Attempt 3: Dropbox
As I was pondering how I could make the process of making sure my deployments were “in sync” with my local files, I had an idea pop into my mind based on a previous Netlify project I built.
Every time I make a file change in Dropbox, Dropbox syncs that file to its servers and can send out a webhook saying “hey something changed”. In theory, I thought, that could be the trigger that then sets off a deploy of my site in Netlify with whatever the latest change is. The beauty of this approach is that it could all take place outside the context of my local machine. It would just be two clouds talking to each other. How? Via a lambda function in-between (why a lambda? because I know how to make those with Netlify’s help). So roughly I’d have a dance like this going on:
- I make changes to a file in my “deploy” folder, either on my local laptop or on my phone via the Dropbox app
- Dropbox client syncs that file to Dropbox servers
- Dropbox server sends a webhook to a URL on my domain which triggers a lambda function
- Lambda function receives the webhook, calls the Dropbox API and requests the files that changed
- Lambda function calls Netlify, tells it which files changed, and creates a new deploy
Again, having these two APIs talk to each other, without my involvement, anytime I changed files in my Dropbox folder would have been a thing of beauty. But I only have so many hours in a day.
The problem, I discovered, was that Netlify’s API talks about files in sha1 content hashes whereas Dropbox’s API talks about files in some kind of block-level concatenation of sha256 hashes. “Can’t you just convert a sha256 string to a sha1 string?” While the answer to that question might be obvious to you, dear reader, it wasn’t to me. After some research and answers from people smarter than me, I realized the answer is an abrupt “no”.
So what I ended up with is a fundamental mismatch in how two APIs talk about files.
Not only that, but there are some other sticky points here. For example, Netlify likes to know about all the files in order to run a deploy. You tell it all the files in a deploy, it’ll tell you what it doesn’t already have and ask you to upload it. Under that scenario, every time a webhook comes in, my lambda would have to download all files from my Dropbox folder to disk, calculate the sha1 of each, then pass that to Netlify for a deploy. That’s insanely heavy, especially if the folder you’re syncing is large. It appears the Netlify API provides the ability for you to PATCH a deploy, so in theory you could get a a webhook from Dropbox, detect only the things that changed, then surgically PATCH a previous deploy with those items. But in my lambda I’d still have to download all files that changed, get the sha1, and pass it on to Netlify in a PUT to a specific deploy ID. And that’s all just theory from reading the docs of both APIs. I never actually tried going down that route because it felt like a big hairball I didn’t want to tackle at this point in my life.
Pros:
- Allows for deploys via any client that can add a file to my “deploy” folder in Dropbox
- No need to run any code on my computer to deploy anything
Cons:
- I don’t really know how to do it right.
Suffice it to say: despite the attractive purity of the approach where I step out of the picture and just let two APIs talk to each other, it didn’t seem feasible. Maybe smarter people than I will do it in the future.
Automated Deploy Script, Attempt 4: macOS Daemon
My next line of questioning went like this: ”there’s got to be something where I can say ‘watch for changes in this folder then run a script’”. Turns out, there is.
macOS has a feature called “folder actions”, which is a way to do automation in response to changes to a folder. Additionally, there is launchd which is like the system’s way of doing the same thing.
Through these two articles I learned enough to be dangerous. I even got things working pretty well. I put the right file in the system’s launch agents folder, setup my deploy script, and had my local machine deploying a folder’s contents to Netlify when its contents changed. I even had my deploy script triggering local notifications to my Mac so I could see when things synced.
But there were a couple problems with this approach.
First was a problem with WatchPaths in my launch agent:
If the path points to a directory, creating and removing this directory, as well as creating, removing and writing files in this directory will start the job. Actions performed in subdirectories of this directory will not be detected.
That last line is kind of a deal breaker. I need the entire directory structure to know to sync anytime a file n levels deep changes. However, even though these launchd docs state this, I didn’t necessarily find it true in practice. I changed a number of files a couple levels deep and the deploy ran as expected. So I guess technically not a problem, but definitely a lack of trust introduced there.
Second, I had a problem with launchd consistently running my script. If I added one file to my directory, it ran just fine. If I copied three files at once into my directory, again no problem. But once I started doing file changes in quick succession, like for example, delete three files one after another, not all three of those “events” seemed to register with launchd. As another example, if I added three files to my directory in quick succession–rather than all at once—the system seemed to pick up the first or second changes and run my script based on that point in time. But it didn’t seem to register that last file addition. This left me in a scenario where the folder structure on my machine did not mirror what was at my live URL, which left me in a situation where I needed some kind of “do a manual deploy to make sure everything is in sync” button. Falling out of sync is a big deal breaker, so I abandoned this solution because I couldn’t figure out how to get it to work precisely (and there wasn’t a lot of useful information on the web about it).
Pros:
- System level file watching for changes, then run a deploy script.
Cons:
- Trigger automatic deployment on file change: didn’t worked as expected; resulted in countless deploys for quick, successive changes in batch.
- Lack of clarity in docs. Apple’s docs are just ok, and third-party ones don’t seem to represent how the thing actually works.
- Lack of trust in the dependability of the thing
- Lack of transparency into the deploys; only got a notification when sync succeeded or failed.
Automated Deploy Script, Attempt 5: BitBar (Again)
the end of all our exploring will be to arrive where we started and know the place for the first time – T.S. Elliot
After trying a number of things, I ended up back at BitBar.
It's probably worth noting that, at first, I imagined my menubar app functioning like Dropbox’s: you make some changes on disk, it shows a little “syncing” icon, and when that icon disappears, you can infer things got synced.
![]()
But BitBar doesn’t make that easy. The BitBar app is essentially the output of a script that runs on a timed schedule. And because of the async nature of my script (check if any files changed locally, if so, run a “deploy” through the Netlify API which involves uploading files, etc.) BitBar won’t output the results of the script until it’s done. So if I make a change to a file, BitBar would detect it but only once the timed interval for invoking the script comes around. You can instruct BitBar to run the script every 3 seconds, 3 minutes, 3 hours, or more. But when it does run, it takes a second. So I can’t tell it to log a “syncing” icon because it won’t be done syncing until the script has finished, at which point it’s too late to really communicate that piece of information.
Suffice it to say, that was a deep pool I waded in to. I tried spawning other node processes and keeping track of the state of things via a JSON file on disk. That allowed me to run the BitBar plugin very frequently and, if a deploy was needed, immediately have the script output indicate it’s syncing while kicking-off the async “deploy” process as a separate node process. It worked and was pretty cool, but there were a number of edge-cases which sprung up because I was essentially using BitBar against its own grain as it were.
In the end, I backed away from that approach and instead took a more passive UX approach where, if it ran a sync, it displayed a “success” checkmark when it was done. That served as my “everything’s synced just fine” indicator.
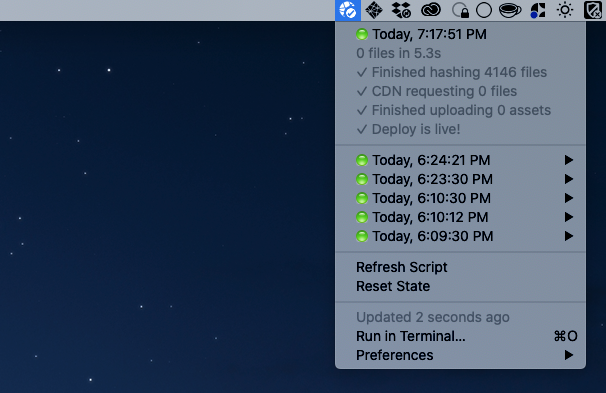
As you can see in that screenshot, I keep track of the most recent “deploys” (i.e. “syncs”) that occur by storing them in a JSON file my BitBar script reads. This allows me to have some easily-accessible feedback about what’s going on with this little script. It’s a log turned into a GUI. The most recent deploy is at top, with its associated information (essentially, an output from the Netlify JS tools) and then I list a few other deploys underneath, with their associated information hidden behind a menu.
Pros:
- Native GUI provides an easy-to-access log of “deploys” for my public folder
- Automated deploys on a timed schedule when files change
Cons:
- BitBar is a bit prescriptive in how I can make the menubar app work.
- Relies on BitBar app to work
Both of the cons in this scenario weren’t really cons for me, but I can see how they would be for others. I would prefer a slightly different UX for this menubar app, but I shipped what I have and it works. I might hack on it later. For now, this solution was the best balance of “get something shippable and working with the tools I know” against “make a nice, native GUI similar to the old Dropbox Public folder”. I’ll probably work on tweaking it another day.
A Glimpse Into Netlify’s CDN Infrastructure
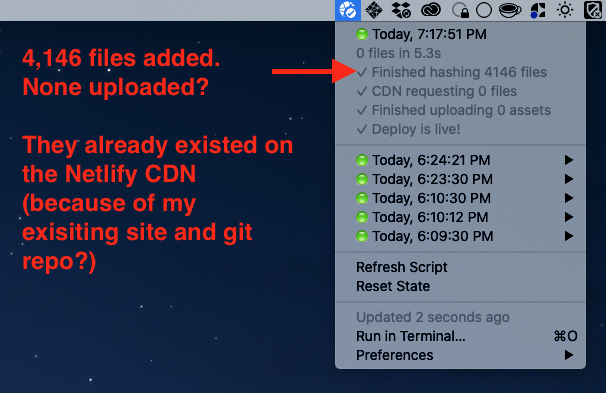
One little thing I found interesting that’s worth noting here: when I first moved all of my content out of my git repo and into this “Netlify Public” folder, I thought I was going to have a loooooong sync ahead of me. I mean, it was >1GB of image data. But it didn’t take long at all. In fact, in BitBar, the data from the log said that it didn’t sync a single file!
At first that seemed really odd. But then as I thought about why that would be the case, it made a lot of sense. Here’s my guess why: all of those images were already on Netlify’s CDN—albeit outside the context of this particular Netlify “site”— so Netlify was smart enough to say “I already have all these images, no need to upload them.”
Cool!
Conclusion
If you take a look at the BitBar script I used for this app, you can check out my repo of BitBar scripts on GitHub.
I’ve been using this little menubar app “in production” for a month or so now. It’s really cool IMO. Even the images you see on this blog are powered by it. I write my posts in markdown and, anytime I want to include an image in a post, I drop the file into the appropriate place of my “Public Netlify Folder”, then reference a link to it in my markdown and boom, a preview-able blog post right in my editor of choice!