Down the Rabbit Hole of Image Optimization Tooling
For some time, I’ve been powering the automation around adding a new icon to my icon gallery sites using a bash script. It’s not perfect, but it works. It’s basically a CLI script that does the following:
- Asks me for the iTunes store URL of the app whose icon I want to add to my gallery
- Asks for additional meta information (for the “post”)
- Creates the icon’s “post” file (
.md) and writes it to disk - Fetches the icon’s artwork from iTunes and writes it to disk
- Creates smaller variations of the source icon file and compresses them (for use on the web)
My bash script used to power all four of those steps, but I’ve been slowly migrating to a script that will do all of that in JavaScript (node). Why? Because bash syntax baffles me and anytime I need to tweak a thing or two, it takes me hours to figure out the right syntax.
At the moment, I’ve migrated all of the steps listed above to a single node script except for that last step—that’s what this post is about.
How I Was Doing It
My previous bash script was essentially a .sh file that, when run, triggered a node script which gathered all of the details about an icon, fetched its artwork from iTunes, wrote it to disc, then handed control back to bash. By the time my node script handed the reigns back to bash, I had everything I needed except for the optimized/resized icon variants. You see, iTunes will give me a large 1024×1024px icon, but I don’t want to serve that icon everywhere on my site. Instead, I keep a number of resized and optimized variants on hand for contextual usage throughout the site. This means that, for every icon I add to my gallery, I (as a general rule) store five different versions of that icon:
- An untouched, 1024×1024px original from iTunes
- An optimized, resized 1024×1024px version
- An optimized, resized 512×512px version
- An optimized, resized 256×256px version
- An optimized, resized 128×128px version
Previously, I was using imagemagick and imageoptim on my local computer to resize and optimize each icon before committing it to git. This resulted in a .sh file which looked (simplistically) like this:
# Fire my node script for adding an icon to my gallery
npm run create-post
# At this point, I now have a `title-of-post.md` file and a `icon.png` file
# Now I create a number of variations of the source `icon.png` file
for file in *.png; do
  # resize with imagemagick
  # optimize with imageOptim
done
# Move to appropriate locations, commit, and push the changes
In addition to not writing bash scripts anymore, I wanted to migrate this logic to node so that I didn’t have to rely on specific CLI tools being installed on the computer running this code. In the past, I’ve really only ever run this code on my own laptop so I could ensure imagemagick and imageoptim were installed on my computer and available. But I’ve wanted to get to a future where the code that creates a post could, conceivably, be run as a lambda. Then I don’t have to open my laptop to create a post. I could, say, just POST to a URL with the iTunes app link (and any extra metadata) and my post would be created automagically by some server in the cloud. This would be easier to setup and control if I used node-based tools available on npm.
So that’s what led me to the following rabbit-hole of research and comparison.
Image Manipulation Options for Node
As mentioned, I was previously using imagemagick to resize images and imageoptim to optimize them (both triggered via CLI commands). The imageoptim tool for Mac is fantastic; the one drawback is that its kinda slow. Not slow in a bad way, granted, because it’s doing lossless compression. But I wanted to benchmark possible node-based tools out there to see how they compared for image compression.
To be clear, there are a number of options out there. The major axis of differentiation (at least to me in this case) are tools that do lossy vs. lossless compression. imageoptim for Mac does lossless compression, which means larger file sizes but better image quality. Because the entire “raison d'être” of the icon gallery sites is to showcase the beautiful artwork of icons, I didn’t want to sacrifice image quality for better compression. That’s essentially why I had been doing lossless compression the entire time (plus it was just the default for the Mac app).
I discovered a couple tools in npm that claimed to do lossless compression, so I tested them out (FWIW I also tested out the lossy compressor PNGQuant which was insanely fast in comparison, but the image quality was severely degraded – go figure).
Once I had a couple tools for consideration, I found a good icon to test against. What makes it good for testing? There’s a lot going on in that PNG so compression takes a long time.
What you see below is a comparison of tools and how long it took each one to take a source .png file, resize it, then optimize it (note that these times are for all those actions, not just the optimization aspect):
| Tool | Type | Time | 1024 | 512 | 256 | 128 |
|---|---|---|---|---|---|---|
| imagemagick + imageoptim | Lossless | ~58s | 438KB | 171KB | 62KB | 22KB |
| pngcrush | Lossless | ~56s | 475KB | 181KB | 66KB | 23KB |
| optipng | Lossless | ~12s | 474KB | 181KB | 66KB | 23KB |
| pngout | Lossless | ~19s | 624KB | 264KB | 102KB | 35KB |
| advpng | Lossless | ~6s | 500KB | 264KB | 102KB | 35KB |
| pngquant | Lossy | ~1s | 206KB | 63KB | 21KB | 8KB |
The top item (imagemagick + imageoptim) was my baseline (that’s what I was using in my bash script). As you can see, it actually took a good chunk of time to process each icon variant (about a minute).
The table shows none of these tools from npm were as good as the imagemagick + imageoptim combo. Some were definitely faster, but none resulted in equivalent image quality + file size. Remember: every tool on this list did lossless compression except for pngquant, which did lossy compression—that’s why it was so much faster than all the others, not too mention its resulting file sizes are much smaller. Here’s a look at a visual comparison of each file at 128px square, blown up for juxtaposition.
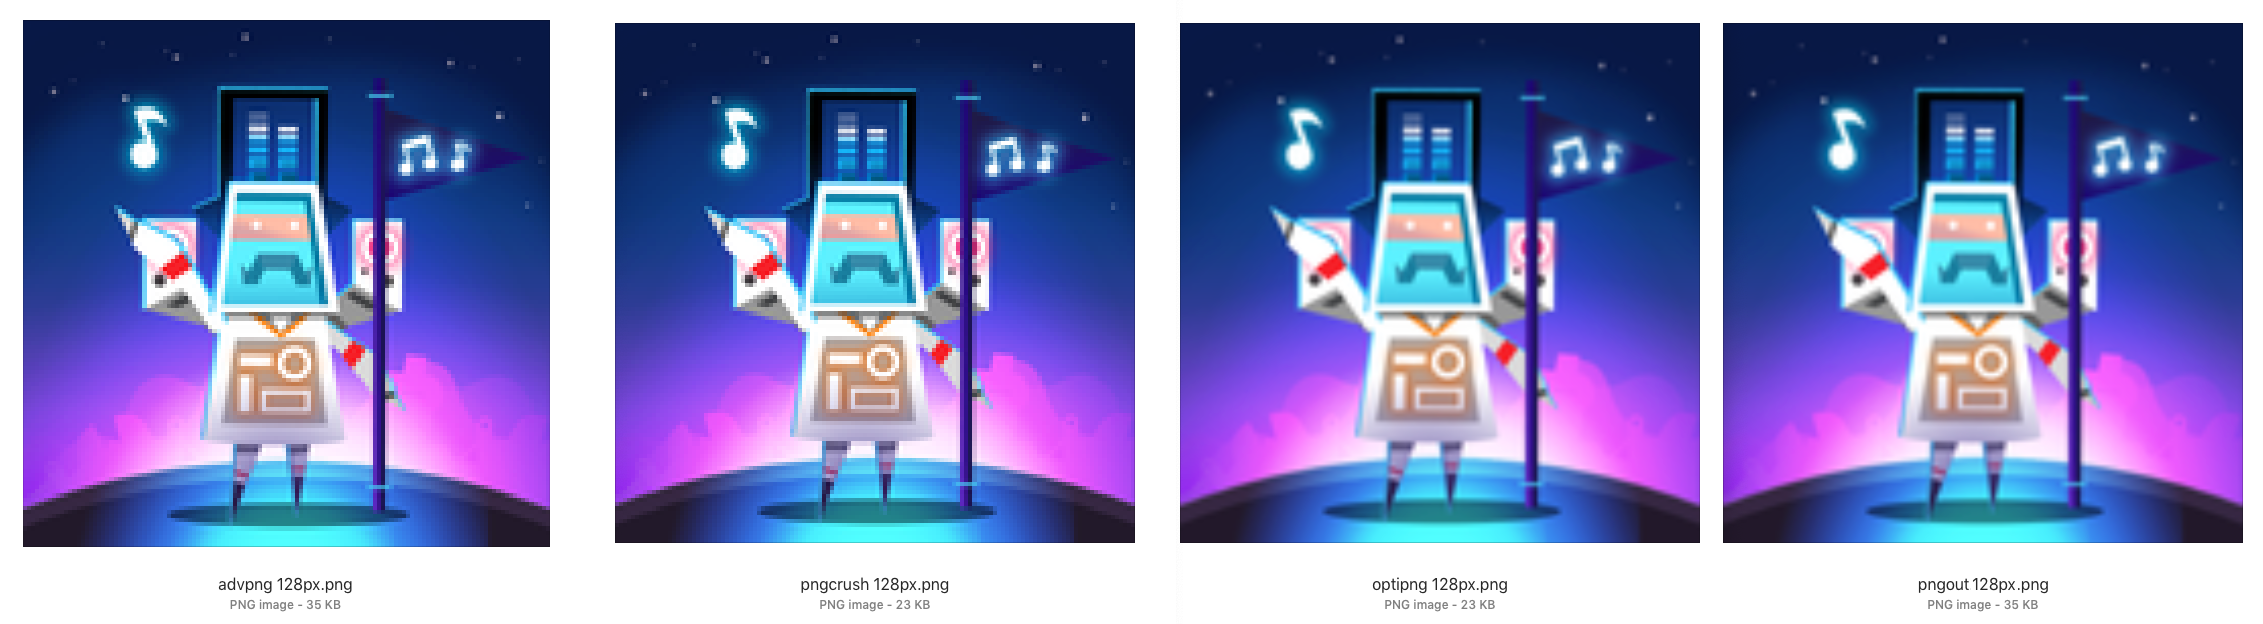
My tests led me to discover that optipng and pngcrush were equivalent. Same file size output, same visual quality (to my eye). The only difference was the compression time. optinpng was an astounding 12 seconds in comparison to 56 seconds by pngcrush. I decided to dive a little deeper into that, as most of the tools had a couple different options you could play with to tweak output size, processing time, etc.
Diving Deeper with optipng
optipng had an configuration option called the optimizationLevel, which has to do with the number of “IDAT compressions trials” it runs (more trials, slower time). I tried three different approaches with this option to see if/how it would affect the image output:
optimizationLevel |
Time | 1024 | 512 | 256 | 126 |
|---|---|---|---|---|---|
Min 1 |
~5s | 474KB | 181KB | 66KB | 23KB |
Default 3 |
~12s | 474KB | 181KB | 66KB | 23KB |
Max 7 |
~89s | 474KB | 181KB | 66KB | 23KB |
What I found is that the results didn’t seem to differ at all. The file size and visual output all appeared identical. The only thing that differed was the time it took to run each. So I figured if I was going to go with optipng, I may as well just stick with the default.
optipng vs imageoptim
If I was really going to replace imageoptim with optinpng, I wanted to dive a little deeper into comparing the output of each. This led me to choose a sample of icons which varied in visual complexity. You can usually tell what images will take longer than others to optimize and compress based on the visual sophistication of the icon (a “flat” icon design will likely be processed much quick than, say, a “skeumorphic” icon which has a lot of visual detail).
Here’s how they did:
| Tool | App | Time | 1024 | 512 | 256 | 128 |
|---|---|---|---|---|---|---|
| optipng | Oddmar | 17.5s | 941KB | 304KB | 98KB | 31KB |
| imageoptim | Oddmar | 73.6s | 901KB | 293KB | 95KB | 31KB |
| optipng | Calcly | 0.7s | 5KB | 8KB | 4KB | 2KB |
| imageoptim | Calcly | 52.9s | 4KB | 3KB | 2KB | 1KB |
| optipng | Unobstruct | 33.2s | 516KB | 165KB | 49KB | 16KB |
| imageoptim | Unobstruct | 54.7s | 207KB | 57KB | 18KB | 7KB |
| optipng | Mario | 6.8s | 963KB | 254KB | 69KB | 22KB |
| imageoptim | Mario | 52.4s | 945KB | 248KB | 67KB | 22KB |
The results show that, although optipng was always much faster, it never once could get better compression than imageoptim. I seriously considered using optipng because it was so fast in processing the images and the results always looked equivalent to imageoptim (at least my eyes couldn’t tell the difference). The one thing that kept nagging at me though were the numbers. Sometimes optinpng’s compressions was absolutely terrible compared to imageoptim’s. For example, look at the compression for the Unobstruct app icon: 512KB vs 207KB. imageoptim’s compression was more than twice as good!
Deciding on imageoptim
imageoptim has an API for optimizing your images. I had seen this, but figured it cost money. After exhausting my options on npm and still feeling unsatisfied, I decided to take a closer look at what imageoptim charged for their API service. Upon closer inspection, I learned that what cost money was optimizing and hosting your images through the service. If you plan on hosting the images yourself, you can use imageoptim’s service for free! This was the best of both worlds because now I could get the best compression and I didn’t have to use any npm tool! Lesson? You should actually read the instructions docs.
Optimization and Resizing: Server vs Local
Before fully switching over to imageoptim’s API service, I wanted to do a little comparison. My question was: what would the differences be (if any) between processing and optimizing icons locally using imageoptim’s Mac app, and processing and optimizing icons remotely via imageoptim’s API?
First I took a look at the differences between optimizing AND resizing an image through the API vs. optimizing through the API but then resizing locally.
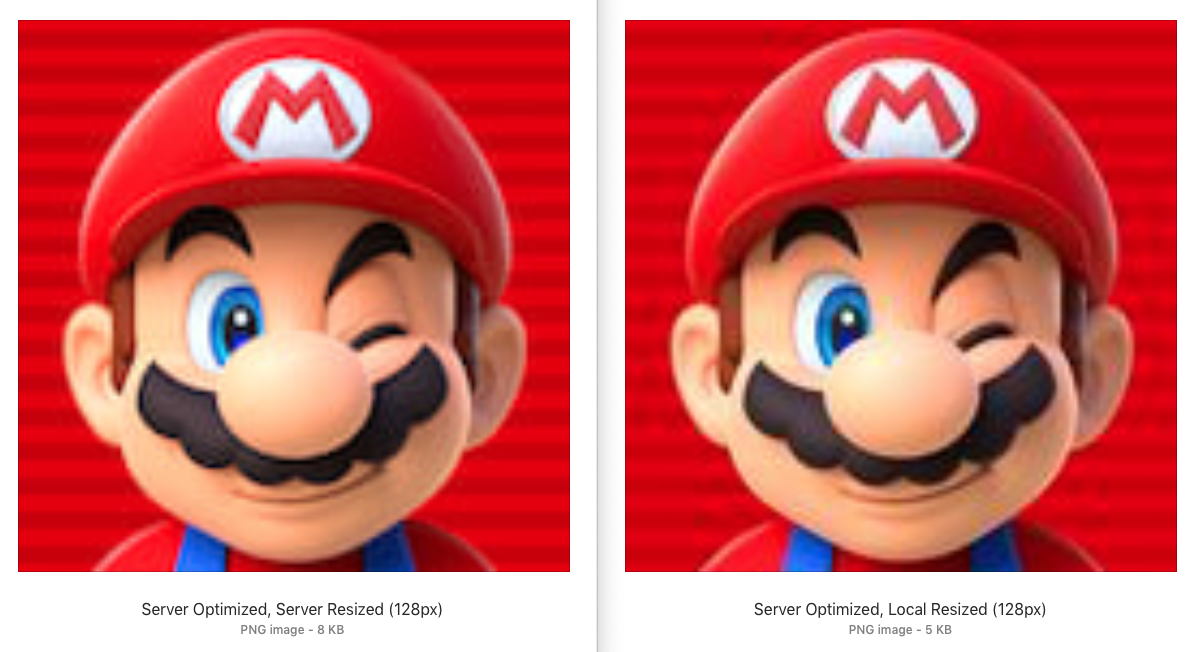
As you can see, resizing locally with node (using sharp) resulted in degraded image quality. I tested with a couple other icons and saw the same result.

I also found that, not only was resizing locally resulting in worse image quality, but resizing through the API was too! This was puzzling to me until, deep in the docs, I found that if you ask the server to resize, it’s not going to do lossless compressions anymore. That meant, if I wanted lossless compression, I’d have to give the imageoptim API a lossless source file at each size I wanted. In other words, I couldn’t say, “here API, here’s my lossless source file of 1024px, I want 512px, 256px, and 128px of that optimized”. Rather, I had to say “here API, here’s my lossless source file of 512px, optimize it. Now here's my lossless source file of 256px, optimize it.” etc. Fortunately, this wasn’t too difficult because the iTunes API will give me back a URL for an app’s icon and I can request the size I want on the fly. So instead of having to download an icon myself to disk from iTunes, then upload it to imageoptim (and do this for every size I want), imageoptim actually accepted a file upload or a URL, so I could pass the iTunes URL to imageoptim and just change the file size in the URL that iTunes was providing.
Optimizing Only
Now I finally felt like I was on the right track. Get the URL for the artwork of an icon from iTunes, pass that URL to imageoptim through about five different API calls—one for each image size I needed—asking for high quality on each, then get each image and save it to disk. The last thing I wanted to do was make sure the imageoptim API was producing an optimized image identical to the imageoptim app on my local Mac.
Guess what? They weren’t identical. At that point I didn’t know what to do or how to reconcile those changes. So I wrote an email to the maintainers of imageoptim. Here’s the image comparison I sent them and an excerpt from that email:
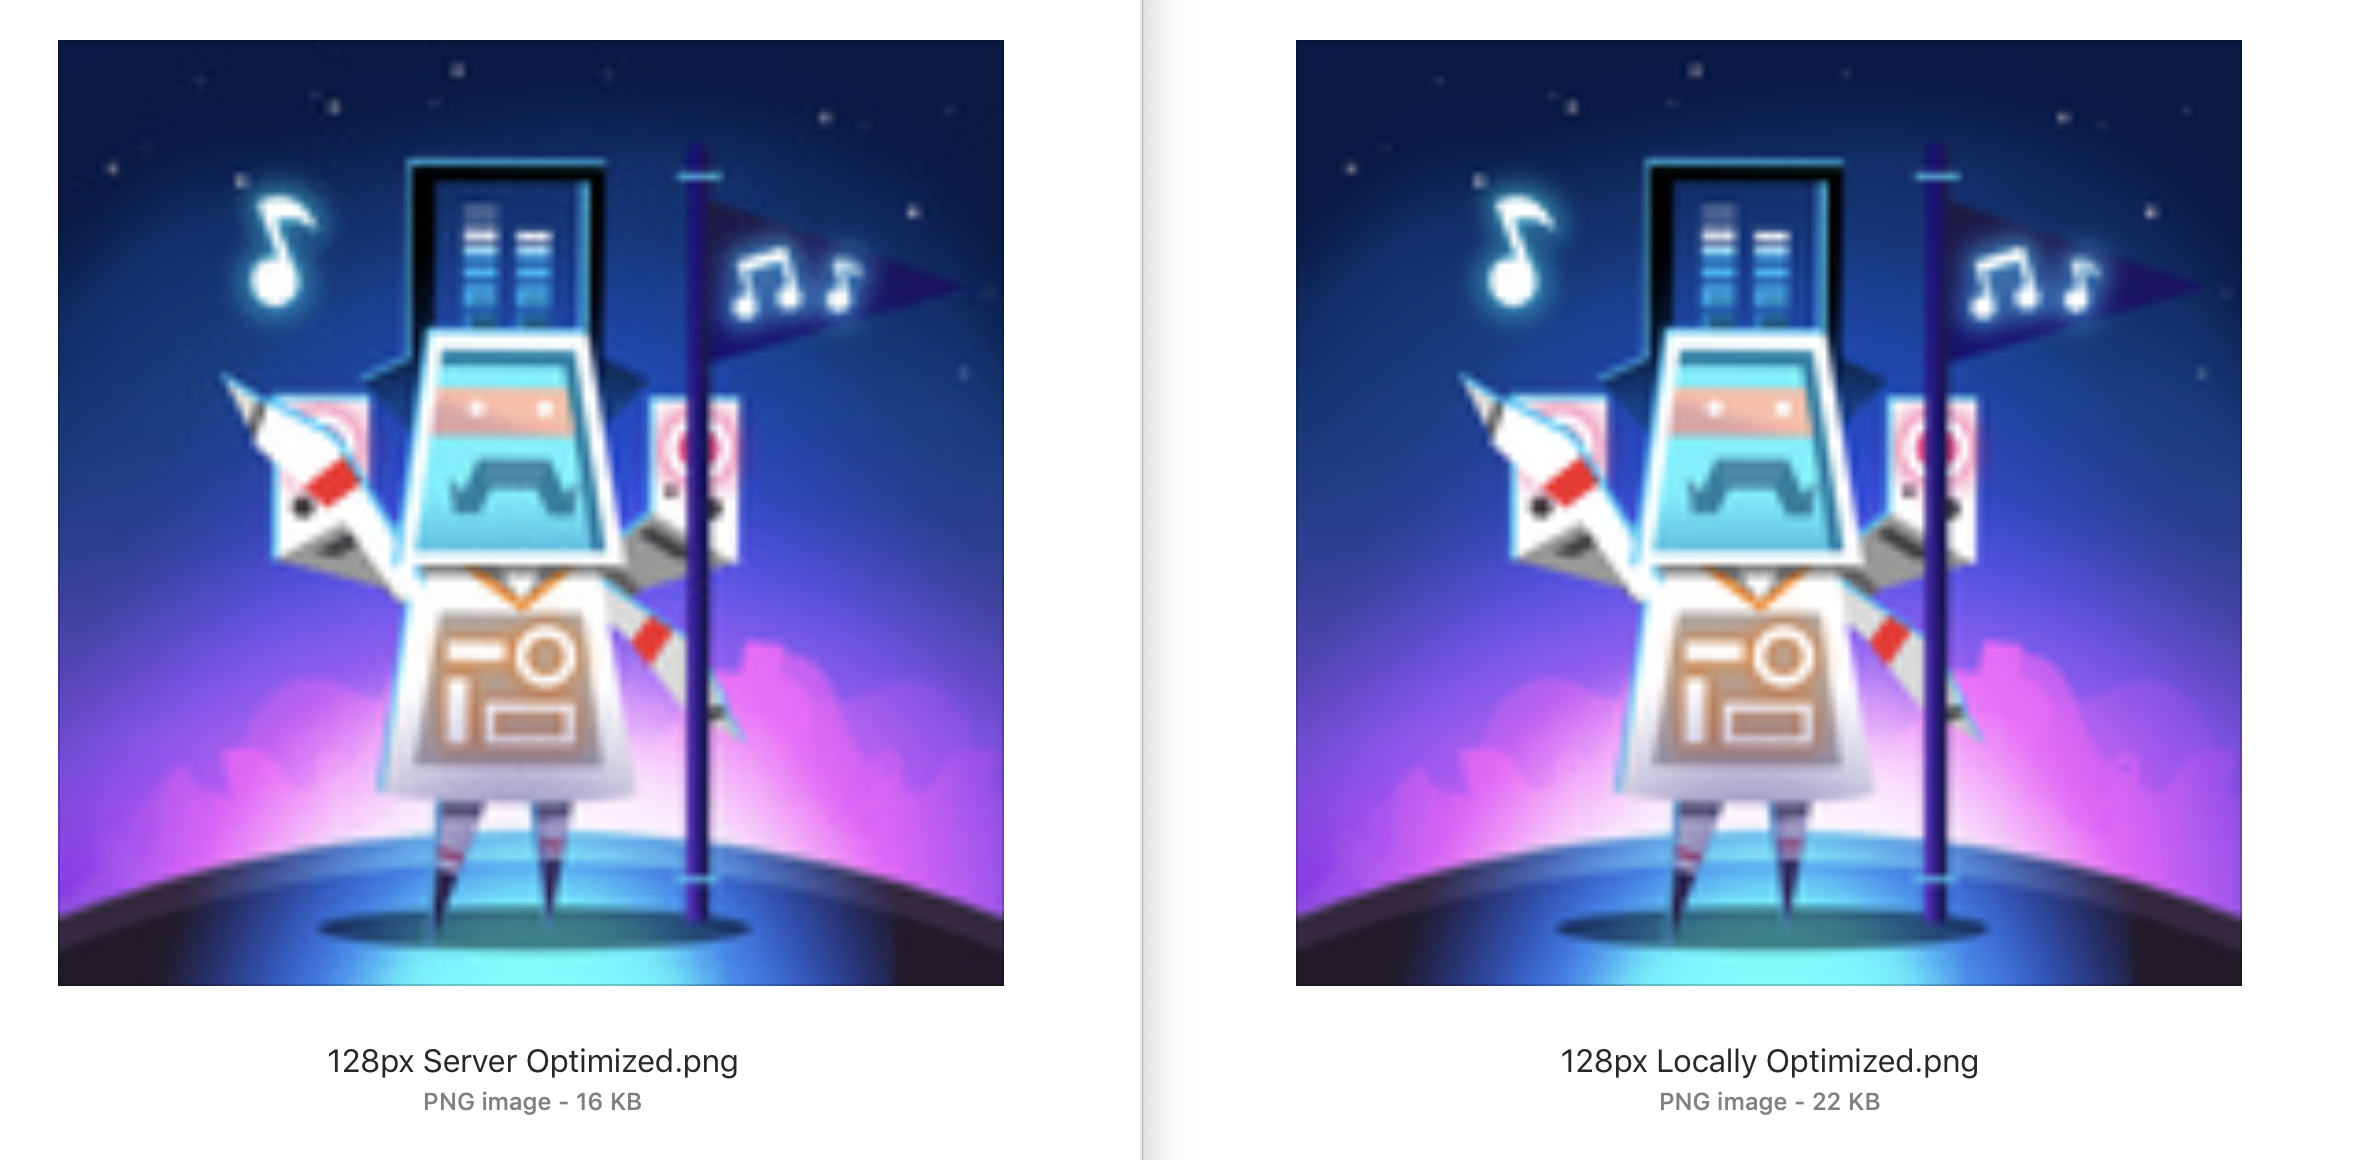
The one on the left is optimized by the API. The one on the right is optimized locally. You can see the server optimized one is smaller in size, but it also seems to be lossy even though I specified
full,quality=lossless[through the API]. Is this expected? My assumption here is that if I pass the source image to the API specifyingfull,quality=lossless(without any resizing) and I pass the same source image to the ImageOptim Mac app, I would get the same result. But that doesn't seem to be the case? Is there a way I can get the same result from your API that I would get using the Mac app on the desktop?
Here’s the response I got:
Behavior of the Mac app and the API is different.
The Mac app when it's lossless, it's strictly lossless, because it overwrites the original file.
The API is usually used only to serve a copy of the image, so it's not as strict and interprets lossless as in "you won't see the difference", but can change the pixels slightly. You have good eyes :)
So there you have it. The API can’t give me compression equivalent to what I’d get if I used the Mac app on my local computer—but what it does give me is actually pretty darn close. And since I’m keeping a copy of the original from iTunes, the trade-offs here are good enough for me to just go ahead and start using imageoptim’s API.