Migrating from Pathnames to Subdomains for jim-nielsen.com
As you might know by now, I’m a fan of Netlify and I’ve been transitioning to them (from Github Pages) for all my web hosting needs. I used my icon galleries sites as lab rats of sorts for getting my feet wet in building, deploying, and hosting through Netlify. And guess what? It’s all worked perfectly (the rats are all safe and sound as it were). What I love about Netlify is it gives me liberty in choosing how I build and deploy my site, which results in a codebase and project structure that fits the needs of the site, rather than a codebase and project structure that fits the needs of Github Pages. With my beta phase of using Netlify over, I decided to switch over all my web real estate at jim-nielsen.com.
All of my one-off projects at jim-nielsen.com actually live as pathnames of the host (i.e. jim-nielsen.com/sassme, jim-nielsen.com/teamcolors, etc). This always irked me a little bit, as none of my projects had any semblance of uniformity with the “home page” host (jim-nielsen.com). Subdomains for each project, instead of pathnames, always like a better fit. However, when I initially setup all these projects using Github Pages, doing pathnames was my only option (honestly, I can’t remember precisely why...) so I never got around to doing subdomains for each project. Netlify, however, gave me the excuse to finally do it.
So now, after switching everything over to Netlify, if you visit any of my web properties you’ll notice the following changes:
- jim-nielsen.com → www.jim-nielsen.com
- The apex domain,
jim-nielsen.comstill points towww(I took Netlify’s advice)
- The apex domain,
- jim-nielsen.com/blog → blog.jim-nielsen.com
- jim-nielsen.com/logo-integrity → logo-integrity.jim-nielsen.com
- jim-nielsen.com/sandbox/old-interfaces → old-movie-uis.jim-nielsen.com
- jim-nielsen.com/sandbox/kindlinglovesstartups → kindling-loves-startups.jim-nielsen.com
- jim-nielsen.com/gimmiedaticon → gimmie-dat-icon.jim-nielsen.com
- jim-nielsen.com/teamcolors → teamcolors.jim-nielsen.com
- jim-nielsen.com/sassme → sassme.jim-nielsen.com
A few notes about the above changes:
- It’s all
httpsnow. Netlify makes this really easy if you use their managed SSL. I always meant to make my siteshttpsbut for the longest time Github Pages didn’t supporthttpsfor custom domains. Somewhat recently they changed this, but too little too late Github. - Old URLs all get 301 redirects thanks to Netlify
- This was always a strict drawback to Github Pages as you didn’t get even the slightest bit of control over how the server responded to a request. This made sweeping URL changes to your site difficult to deal with (in general, the way you dealt with it was you generated static html pages at all of your old URLs that contained a
<meta http-equiv="refresh" ...>redirect tag).
- This was always a strict drawback to Github Pages as you didn’t get even the slightest bit of control over how the server responded to a request. This made sweeping URL changes to your site difficult to deal with (in general, the way you dealt with it was you generated static html pages at all of your old URLs that contained a
- I used to have a repo called
sandboxwhere I stuck just a bunch of static stuff. It was workaround to how Github Pages makes you host things. With Netlify, I was able to be very atomic about my repositories and deployments. Each sandbox item became it’s own repo with it’s own subdomain.
Not that I’m cheap (but I am) but doing all of this on Netlify was free (which is awesome, but also slightly worrying as I don’t want them to go out of business).
The Technical Details
Here’s a really fast look at how I actually made the transition from Github Pages to Netlify while not breaking all my old links (because cool URIs don’t change).
My First Misstep
Because my apex domain (jim-nielsen.com) was controlled by Github, it initially appeared like there was no way I could switch things over one by one. This was going to be an all-or-nothing approach. But after some Googling, I found this possibility on Stack Overflow that illustrated how you could host multiple Github repos on Netlify while using the same custom domain. The solution lies in the fact that Netlify gives you some control over how the server responds to a request. I realized that through using Netlify’s custom _redirects file, I could proxy requests from one “project” in Netlify to another while making the URLs appear as though they hadn’t changed.
For example, when you setup a site in Netlify, your site gets a x.netlify.com subdomain. So, as an example, I had two different repos in Github, each representing a different part of my site (a constraint once forced upon me by Github Pages):
jim-nielsen.compointed to my repojimniels.github.iojim-nielsen.com/blogpointed to my repoblog
After setting up both these repos in Netlify, I now had jim-nielsen.netlify.com representing (what would be) jim-nielsen.com and I had jim-nielsen-blog.netlify.com representing (what would be) jim-nielsen.com/blog. Now all I had to do was add a _redirects file that proxied requests to /blog to my other Netlify project at jim-nielsen-blog.netlify.com.
At first I thought this was going to be my path forward. It would allow me to keep all my URLs the same yet switch all deployment/hosting over to Netlify. It seemed like a nice “half-step” towards my end goal of having a subdomain per repo and everything hosted on Netlify. My rough outline for moving in this direction was:
- Set up all Github repos as sites in Netlify (with a
x.netlify.comdomain). - Setup
jim-nielsen.comas a site in Netlify and make sure it has_redirectsfile following the structure of the Stack Overflow suggestion which would proxy all path requests ofjim-nielsen.comto my customx.netlify.comNetlify project domains. - Once all repos and sites were setup in Netlify, test each redirect from my
jim-nielsen.netlify.comdomain (i.e. make surejim-nielsen.netlify.com/blogwould proxy the request to myjim-nielsen-blog.netlify.comproject in Netlify while keeping the URL in the address bar asjim-nielsen.netlify.com/blog) - If everything worked as expected, change
jim-nielsen.comdomain to point at Netlify instead of GitHub. - And of course, test everything again for good measure.
After getting to step 3, I realized this was actually more complicated than I thought. As the Stack Overflow solution points out:
You will however need to ensure that any urls used in the [proxied] repo are correctly relative to [your root domain], which may be easy or may be very hard depending on the build system.
Each of my repos were a little haphazard with how they were handling URLs (be it absolute or relative) and since they were static pages hosted at jim-nielsen.com via Github Pages, I realized that this half-step towards getting things into Netlify was actually going to be more complicated than going all the way to where I wanted to be: a subdomain for each repo.
A Subdomain For Each Repo
The biggest challenge in setting everything up as its own subdomain was that I would have to go through and audit every single repo to make sure all URLs (like <a> tags, RSS links, and open graph tags) were prepared for a change of location. I had been trying to avoid this because the manic person inside of me knew that if I touched an old repo, I’d see all the things I did wrong back when I built it and wouldn’t be able to not refactor things. It seemed as though moving half a dozen projects from pathnames to subdomains would end up resulting in half a dozen projects being modernized, which would take forever.
I’m not going to lie, that’s kind of what happened, at least on some projects. Some of the repos I touched were really old and I hadn’t built them in a very portable way, so I tried to only fix those aspects. However, there were also a couple repos where I didn’t have to change a single line of code for them to work (hooray for Jim of yesteryear).
Probably the most common change I had to make to each repo was to set up a standardized build process. Most projects had some kind of build process that resulted in a few compiled files being committed into git so Github Pages would host them. You see Github Pages (at least when I set these projects up) essentially just plopped your repo onto a web server as-is, so many of my repos had strange file placements to make things work, like a compiled index.html file in the root of the repo. I had a couple project structures similar to this:
.
├── package.json
├── package-lock.json
├── .gitignore
├── README.md
├── src/
|   └── index.mustache
├── favicon.ico
└── index.html # generated file
Note how a lot of my code/project/non-web stuff was intermixed with content like index.html because it had to be at the root due to the way Github Pages did deploys. With Netlify, I was able to go into a lot of these projects and change this structure to properly separate concerns and reflect the source/build nature of each project.
.
├── package.json
├── package-lock.json
├── .gitignore
├── README.md
├── build/ # generated site as a whole
├── public/
|   ├── favicon.ico
├── src/
    └── index.mustache
Here are a couple examples of the code changes that took place for each repo:
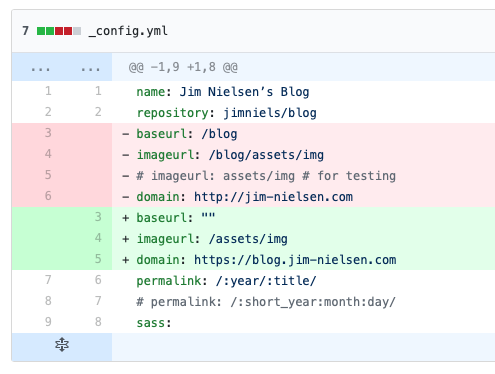
Config Values
This is a code diff from my blog (which runs on Jekyll). I had a few config values which drove most of the way my URls worked, so changes were relatively self-contained and easy to make.
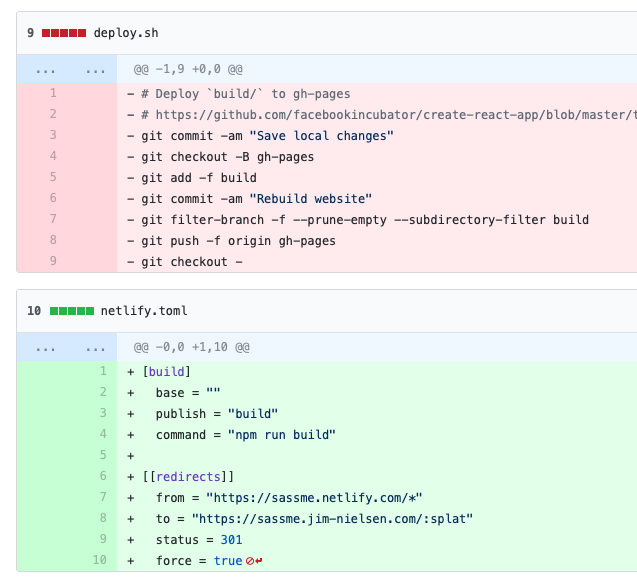
netlify.toml
I added a netlify.toml file to all my repos so that I could define and control the project setup and build from a single file (rather than having to login to the Netlify UI to do it).
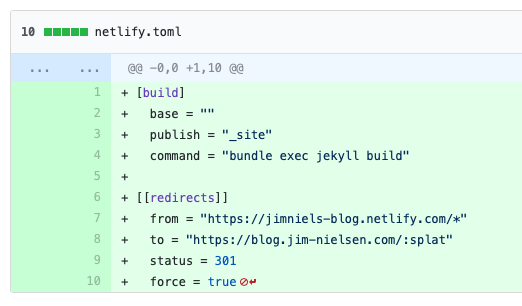
(You may have noticed in that screenshot how I also added a 301 redirect for everything at my site’s custom Netlify domain, this is just to ensure any traffic to the auto-generated x.netlify.com URL ends up at my custom domain, since it is the canonical source of the content.)
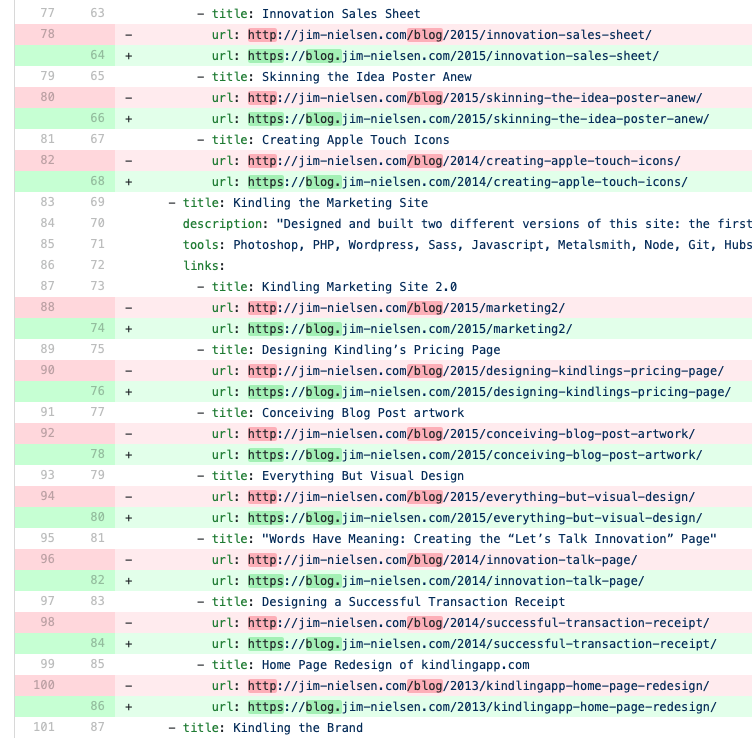
Static URLs
Here’s an example from my homepage at jim-nielsen.com. I made sure to update links from the old ones to the new ones. Granted, I setup proper 301 redirects for my old URLs, so I didn’t have to change these, but I’m a little OCD about my web real estate.
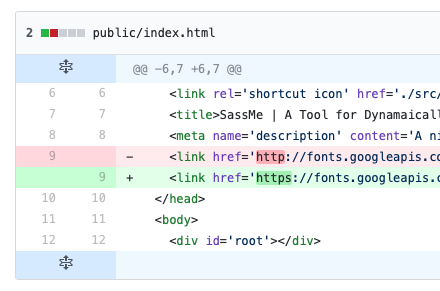
HTTP to HTTPS
A couple of my sites had http links scattered throughout them, which would trigger a warning in the browser about using https but linking to http stuff (most of these were discovered when I opened each site at its new subdomain and saw warnings in the browser console).
Deploy Scripts
As mentioned, many of my sites were “dynamic” in that they were compiled to static files from source data. In a few cases, I had deploy scripts which would compile the content and commit the files to a gh-pages branch, so as to not sully up my source code with compiled files. Netlify obviated the need for any of this trickery by building the entire site to a directory not under source control then deploying from it.
How It All Played Out
I made sure every repo was setup as a site in Netlify then I verified each site by looking at it in the browser under its custom x.netlify.com domain. Once I had every site working, I knew I could then point my jim-nielsen.com domain at Netlify.
Putting my domain under the control of Netlify was super simple. Within about 10 minutes, everything was working as expected and old pathnames were redirecting to new subdomains. There were a few things I noticed that I had to go through and change, but the process was as simple as making the change, committing the file, and pushing. From that point, Netlify took care of the rest by triggering a build and deploying the site without my intervention.
An Example of “The Netlify Advantage”
I just wanted to point out one of the neatest advantages to switching this all over to Netlify. My homepage, jim-nielsen.com, has a list of the most recent posts from Dribbble and my blog.

There’s a couple different ways you could do a widget like this. One way would be to use client-side JavaScript. This would mean that every person who hits my site would run JavaScript code which hits the Dribbble API and my blog’s JSON feed to get the latest content and then render the page. Besides the oft-ignored problem of “what happens if JavaScript is disabled?”, this wouldn’t really work because the Dribbble API is rate limited. Not that I get massive traffic to my site or anything, but this is still a problem because every visitor would be hitting Dribbble’s API and I would therefore run the risk of overdosing on my allotted API calls.
I could do this server side. Setup like a cron job that runs every so often and fetches the latest content to a cache file which gets used to render the HTML. But then I have to setup and maintain a server, which I don’t want to do.
So the way I went about this when I was using Github Pages was that I had node script in my repo which I manually ran every once and a while. It would look at the Dribbble API and my blog’s JSON feed, grab the latest content, write it to a file, and commit it to my repo. Then at build time, my index.html templating system would use that cached data to render the page’s HTML with the “latest” content (latest meaning last time I ran my node script).
You can probably already see the dilemma here. If I don't run that node script in my repo every time I publish a blog post or Dribbble image, my homepage is going to be out of date. And to be honest, it frequently was.
However, Netlify to the rescue! Now I have my homepage setup so that, at build time, it pulls in the most recent content from various web sources and builds my site. I also setup build triggers in Netlify so that anytime I publish a blog post or post to Dribbble, Netlify gets notified and triggers a new build of my homepage. I never have to remember to do it myself. It’s awesome!
I really do think Netlify is a distinct web publishing/hosting platform of the future. Granted, it’s not for everyone. There are still people who will want to roll their own server setups, and that’s fine. I’m cool with that. But as for me and my house, we’ll stick with Netlify.